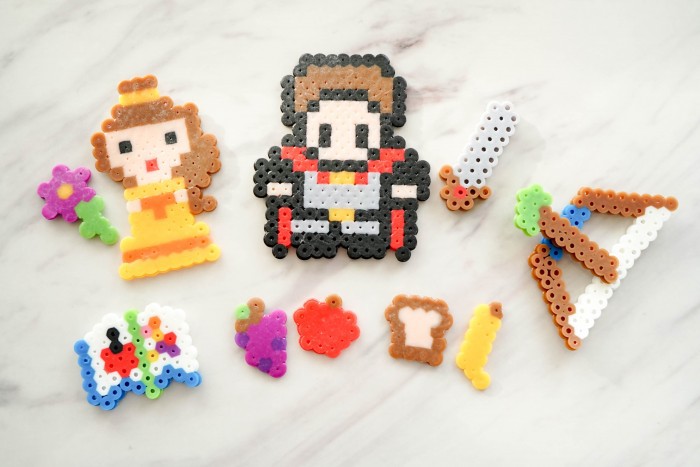
Have your loved ones ever dabbled with perler beads? The sheer fun and countless possibilities with them are exciting. Often, people start with making perler bead keychains. While they’re entertaining and look good, their longevity as keychains can be short-lived.
Recently, we crafted a charming eggs and toast design using perler beads. Although the project turned out adorable, after crafting numerous keychains, we craved something fresh and novel.
That’s when we thought of the Perler Bead Playset! Imagine using our designs to craft a mini kitchen set – sounds delightful, right?
To craft diverse and unique designs with perler beads, you won’t need much. A starter kit is available which includes a spectrum of colors, perler pegboards, and ironing paper. From there, all you require is some inspiration or maybe a bit of internet browsing for patterns.
For instance, I was inspired to make a character resembling an ancient RPG game warrior, necessitating shades of black, grey, peach, brown, and red at the very least.
Crafting With Perler Beads: Steps to Success:
- Draft a Blueprint – Ponder on what you wish to create. Perhaps a play kitchen, akin to our delightful egg and toast design? Or a scene straight out of a fairy tale? My aspiration was to design a heroic character for my sons and a princess to instill the value of respect. Bursting with ideas, our envisioned playset featured: Belle, an RPG Champion, sword, bow & arrow, flora, a tome, and playful food items like grapes, banana, bread slice, and apple.
- Source Patterns – The internet is teeming with free patterns. However, don’t confine yourself. By studying your favorite illustrations or simply experimenting with the beads, you can originate entirely unique designs! My play food and other trinkets were purely imaginative. A significant part of this journey is sheer enjoyment and letting inspiration steer the course. My cherished item? A “magic” book with spells, accompanied by a ribbon marker. The possibilities? Limitless.
- Fuse Your Perler Beads – Post design finalization, an iron paper is essential. Alternatively, kitchen wax or parchment paper can be used, though overused wax paper might leave tiny residues on your beads. Beware of this, as evidenced by my Belle creation. The iron’s setting should be either 3 or 4, suitable for Nylon materials. Always start with a milder setting, gradually increasing as needed. Ensure you don’t accidentally melt the Perler pegboards! Applying too much heat or pressure can be detrimental.
- Ironing Tips: I prefer to expose my beads to about 10-15 seconds of heat, moving my iron in circles. Traditional instructions might advise longer. I aim for just the right melt to ease removal from the pegboard. Afterwards, I detach the pegboard, fold the ironing sheet, and iron the design’s reverse side thoroughly. I then revert and iron the front. Having damaged a few pegboards initially, this method ensures intact pegboards and sufficiently melted designs to minimize breakage.
- Keep Going! With a design under your belt, the sky’s the limit! Keep expanding your perler bead collection until you amass a full playset!
Storing these in ziplock bags makes them an ideal, quiet pastime, especially during church services or waiting periods.
Eager to witness your perler bead masterpieces! Share your designs in the comments!

